Monday, August 8, 2011

Finished! My First Sweater Design

I did it! I can't believe I actually did it! I knitted a sweater from a pattern I designed myself and I LOVE it! I feel like a little kid on Christmas morning!


A few months ago I saw a hat (Courtyard) on Ravelry that I just fell in love with. Well, not the hat exactly, but the stitch pattern. I loved the cool hourglass-shaped twisted stitch pattern. So I bought the pattern, knit the hat and decided that I needed to knit a sweater in this stitch pattern.

LinkI've read a number of books on knitting and designing your own knits. All of which, I referred to during this process. My favorites are:
Knitwear design Workshop by Shirley Paden
Custom Knits by Wendy Bernard
Knitting from the Top by Barbara G. Walker

I love knitting in the round and top-down which is what both Wendy and Barbara teach. Shirley's designs all focus on knitting in pieces and usually bottom-up, but her attention to detail and using math really helped me a lot.

Anyway, I originally pictured a long-sleeve sweater in the same color scheme as my hat (golden yellow and white). However, I just couldn't figure out how to make this stitch pattern cooperate for a raglan and I just didn't feel like messing with set-in sleeves--so I decided to knit a boatneck tank. I also decided to knit in the round and from the bottom up. Although I often prefer top-down, bottom-up seemed to make more sense with this stitch pattern and style.

Next came the search for yarn. I just couldn't find yarn that I loved in the golden yellow and white (and suitable for a boatneck tank). Finally, as I perused my local yarn shop for the umpteenth time, I found the yarn: Sublime baby cashmere merino silk 4 ply. It is so soft (perfect for wearing next to bare skin) and lightweight (perfect for a summer tank). This was a step outside my comfort zone as I don't usually knit with anything quite this nice, but it worked out beautifully. I chose a white and a very pale greenish blue.

My next step was making a huge swatch (7 inches by 15 inches) knit in the round like my sweater.

Next, I looked through my shirts to find one with a fit I loved and that would work well for a model for my tank. I have a boatneck 3/4 sleeve shirt from Gap that I love and I decided to use it for measurements. I measured the shirt's width at the bottom hem and then continued measuring the width at one inch intervals until I reached the top of the shirt. I made note of armhole location as well. I kept these measurements with me throughout the process and they served as a sort of schematic for me.

Next, I did lots of math. I had already found my gauge from my giant swatch (8 st per inch and 10 rows per inch). I figured out how many stitches I needed to cast on (for the ribbing). I had decided to do a K2, P3 ribbing (instead of my original K2, P2 ribbing on my swatch) so that the bottom did not pull in. I figured out that I could simply decrease on the first row after ribbing to get everything to line up nicely from the ribbing to the twisted stitch pattern. After I figured out my cast on number and how to transition from the ribbing to the stitch pattern, I started working out where and how my decreases and increases would work. I even charted out the pattern to see how the decreases/increases would affect the flow of that part of the stitch pattern. I was lucky in that my stitch gauge was 8 stitches. Thus I had to decrease 4 stitches to decrease 1/2 inch or just 2 stitches to decrease 1/4 inch. My row gauge worked out to 10 rows per inch which was perfect as the stitch pattern was split into two 10 row repeats.

At this point, I just had to cast on and start knitting. So I knitted up to the armholes and then stopped to figure out the math for the armholes. I used Shirley Paden's Knitwear Design Workshop to help me. I was really nervous about it, but finally just did it and it worked out great. At this point, I had to switch to knitting back and forth. I thought this was going to make me end up with lots of ends to weave in because the pattern alternates between using the blue yarn one row and then the white the next and then the blue again, etc. This is no biggie when working in the round, you just leave the yarn and then carry it up after the next row. But when knitting flat, suddenly the yarn is at the wrong end of the row when you need it. After cutting ends for a few rows, I suddenly realized that I could just knit back when the yarn was on the wrong end. So I would do two rows right to left and then two rows left to right and then repeat. Very exciting to not have all those ends to weave in!

Finally, I approached the finish line--the top neck! I knew that I wanted a little bit of shaping, but not too much. I decided to do short rows on the outside edges of the front to give a slight dip without changing the pattern too much. I made sure that I got to a point in the stitch pattern where things were worked even so I didn't have to work twisted stitches in my short rows. I did about one inch ribbing on the top to match the ribbing on the bottom. I increased before the ribbing to do K2, P3 again. Ribbing was done on a smaller needle as well. For the back, I knit as the front except that I knit 10 more rows in pattern and no short rows. This raised the back neck up enough that the front wasn't too high. If I knit this again, I might do 2-4 less rows in the back. I think it might be a tad high. Finally I did a three needle bind off to join the top at the shoulders and a regular bind off across the front and back necks.


Now I had unfinished armholes to deal with. The fabric was too flimsy (because of slipped stitches right at the very edge of the armhole) to pick up stitches evenly. I was at a lost at first because I had originally planned a row or two of ribbing or a single crochet stitch edging. But both looked too messy with the loose slipped stitch fabric. What I ended up doing was knitting a crochet chain directly onto the front surface of the armhole. I used the blue yarn doubled and a medium sized crochet hook. I put the crochet hook directly through the fabric at the edge of the armhole, picked up a loop of yarn and pulled it through. I did this all around the armhole and am happy with the results.


Pattern: My own!
Stitch pattern from: Courtyard by Melissa Thomson


Size: Mine! Approximately 31" bust
Yarn: Sublime baby cashmere merino silk 4 ply (50g/ 170m/ 184yds/ 75% extra fine merino/ 20% silk/ 5% cashmere) 2 skeins of white, 3.15 skeins of blue
Needles: Size 4 for body of sweater, Size 3 for ribbing, US G6/4.00mm crochet hook for armhole edging
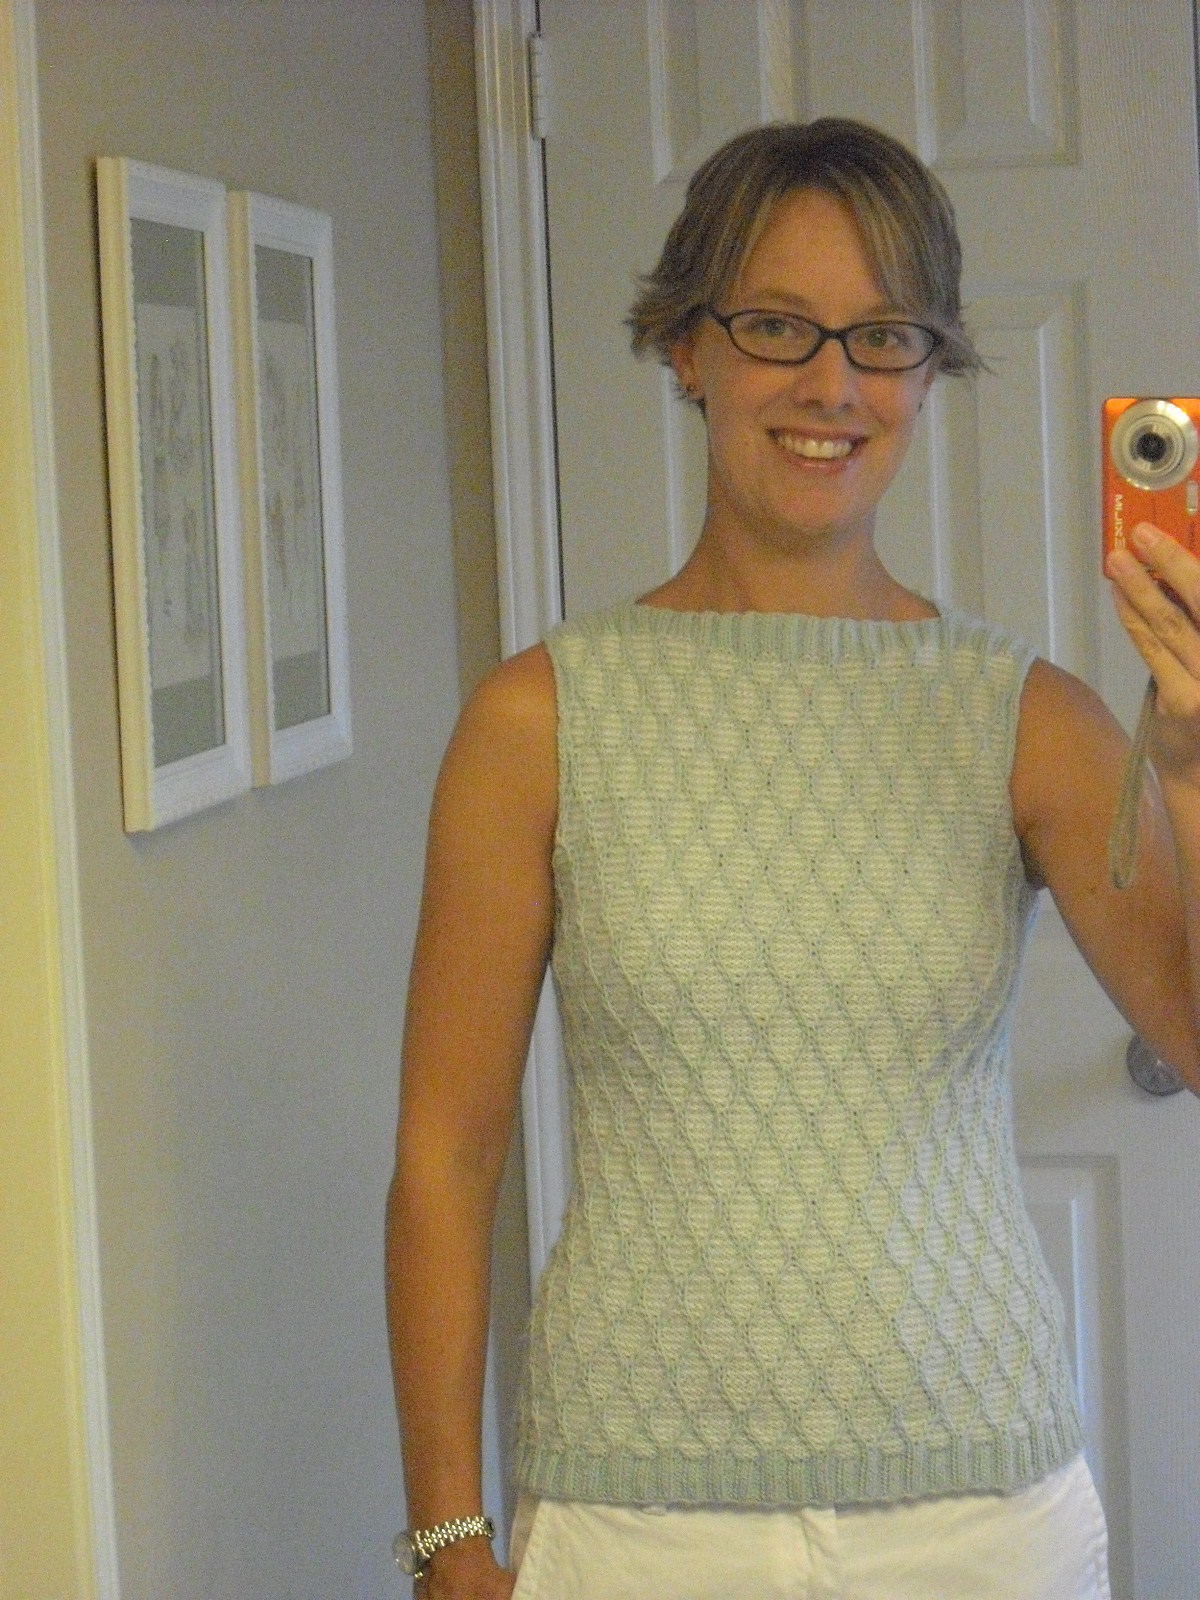
Anyway, there is way too much information about how I designed and knit my first sweater. Now all I have to do is come up with a good name for it. Any suggestions?


I was originally calling it Courtyard Tank after my inspiration and source of stitch pattern. Then I thought of the oh-so-exciting Boatneck Tank. But I want something better. Maybe one catchy word that captures it's essence. Would LOVE some suggestions (hint, hint)...

And, of course, my boys decided to join the photo shoot. Got to love them!


Friday, August 5, 2011

A Fun Visit (and a Review of Legoland Discovery Center)

My good friend Nicole just came for a weeklong visit with her 5 year-old son Will. Nicole and I have been friends since college and have gotten even closer after Will and J were born two weeks apart. Then I moved to Texas (Nicole lives in Austin) and our friendship grew even stronger.

J, Nicole and Will at the entrance to Legoland Discovery Center.

Anyway, Nicole and Will have come for several visits since we moved here and each one is great fun. This week our plans were slightly altered by the 108F and higher temps. The zoo was ruled out as too darn hot. We ended up heading to Legoland Discovery Center in Grapevine instead. Both J and Will are Lego fans and we had never been so we decided to check it out. We were a little nervous because the online tickets were sold out for the morning. (They sell discounted tickets online but only a limited number per hour). We got there right at ten and it was perfect. We only had to wait a few minutes before entering the fun.

After a short interactive tour of a Dr. Seuss-like miniature Lego factory where we learned how Legos are made, we got in line for the Kingdom Quest ride. This ride involves shooting Lego bad guys with your laser gun while trying to come to the princess's rescue. The only chance to ride it is right as you come in and in fact they syphon all guests through this ride before they enter the main area. It was dark and N thought it looked scary so just Nicole, Will and J rode it. After the ride and a chance to buy a keychain photo of ourselves on the ride (which we passed up), we entered the main play area. In the center of it is the Lego City Playland, a huge enclosed play structure--kind of like a Lego-themed McDonald's play structure on steroids. The boys played in it for a bit, but spent less time in the play area than I expected.

Our next stop was Miniland. This is really cool. It's a whole miniature city built from Legos--and, of course, this one was Dallas-themed complete with the Dallas skyline, airport, Cowboys' stadium, Rangers ballpark, Forth Worth Stockyards and even Southfork Ranch. Each area had a button you could push to make something move and come alive.


N especially loved the airport.

J and Will checked out the Dallas Cowboy Stadium.

I had heard that Miniland was more adult-oriented, but our boys really liked it a lot.

Our next stop was the Lego Racers: Build and Test Zone. They have lots of little building stations with buckets of wheels, axles and blocks for building cars. Then there are three steep ramps to race them down and another race ramp complete with start button and finish line.
Will was our most serious builder and spent a lot of time carefully building cars. N and J built quickly and raced over and over.


I had to lift N up to reach the ramp. J could just barely see over it. They both loved it even though their cars often fell apart during the "race."


Next we moved to the Duplo Village complete with a smaller play structure that looked like a barn complete with a spiral slide and large animals made out of Legos that resembled the Duplo zoo animals. Duplo Village is specifically for children age 2 to 5 years. N and J (especially N) had a lot of fun in the barn (climbing up and then sliding down the slide), but the biggest hit in this area for our boys were the giant Lego building blocks. They are soft and rubbery and the boys really enjoyed building with them.

N and J built a tower while Will worked on a giraffe.

At some point, we stopped and had a snack. We brought our own and this seemed to be pretty common. We didn't see anything posted about outside food, but we saw multiple people snacking on food that did not appear to be purchased at the Lego Cafe.

Our next adventure was the 4D Cinema. The Cinema was playing three movies that day in a constant rotation. As soon as one ended, they cleared the theater and started the next one. Each was about 15 minutes long and we watched two of the three. This was our first 4D experience and it was a fun one. When we got wet for the first time, it was a bit of a surprise. When it started snowing in the theater, the boys were really excited--a nice change from the 108F temps outside. J found the Spellbinder movie to be a little scary, but Chase Powers was a huge hit.

Right before the movie started. We were at the end of the line for this movie so we got front row seats.

The movies really were a lot of fun and it was nice that you could pop in line and see one whenever you felt the urge since they were playing constantly. There is a timer outside the theater displaying the name of the next movie and a countdown until the start of the next movie (always 15 minutes or less).

At some point during the day of fun, we attempted to ride the second ride at Legoland Discovery Place--Merlin's Apprentice. This wizard-themed ride looked fun, but the line was long and with only 12 people fitting on the ride per turn (6 groups of 2) it moved very slowly. Also part of the issue, children under 4 feet tall have to ride with an adult. We had three children and only two adults so it didn't really work out for us. I don't think our children cared too much. They were having too much fun in the rest of the place.

Another favorite stop for our boys was a building area that didn't even have a name. It had four building spaces where you could build a structure. Then you turned on the "earthquake" complete with controls to change its strength to see if your structure would stay or fall down. The boys LOVED it. First, they just did it to see things fall, but then they worked to try to build a strong building.

J is ready to see this structure shake and fall down.

N anxiously watching to see if his tower will withstand the shaking.

We were at Legoland Discovery Center until 1PM when we left to walk over to the mall food court for lunch (Legoland Discovery Center is inside Grapevine Mills mall and next to the new Sea Life aquarium). We didn't do everything at LDC (we skipped the Lego Girls Princess Palace and Merlin's Apprentice), but did do everything we wanted to do. We had time to return to things we liked and had a lot of fun. In general, although there were a lot of people there, we did not feel overcrowded or like we were stuck waiting for something. The ride had lines and sometimes the movie line was long, but other areas seemed good. When we left the mall at 2PM (after lunch and a quick visit to the Lego shop), the line to get into Lego Discovery Center was long. I am glad we came right at 10AM like we did.

Overall impression: Legoland Discovery Center is fun with a good amount to do. I feel there are a good variety of activities fit into a relatively small place. I also feel there is a good mix of things that a variety of ages would enjoy. However, it is pricey. It cost me over $50 for myself and my two boys. It was worth it to have this experience with our visiting friends, but we will not be able to make this a regular hangout. My advice: go early and plan to stay as long as you can to get your money's worth.

Sorry for the travelogue description. I just know I've been wondering about this place and found a similar blog description helpful in my choice to go.

Nicole and Will went home today after a wonderful week of fun. I miss them already! So glad we got to have this time together including a great trip to Legoland Discovery Center!

Wednesday, July 27, 2011

Digital Photo Painting

My blogger friend Becky recently blogged about a digital painting that another blogger, Jane, did of her dog Liza Jane. It was a beautiful painting and I immediately wanted to send Jane pictures of my dogs. I didn't have a good picture of Pepper handy, but I found this one of my first girls Zoe and Pepper:


So I sent it on to Jane. And she created this:


Isn't it beautiful? I think she so perfectly captured my sweet girls. I immediately e-mailed Jane and asked her how she does it. Here is her reply:

I would call myself a digital photo painter, my focus being portraits--people and pets--and some landscapes. The photo is considered my sketch which I bring into digital editing program called Adobe Photoshop and then into Corel Painter which with a graphics tablet and stylus I paint stroke by stroke just as I would paint with real paint, a canvas and a paintbrush. I've been doing this for about a year and a half and I'm now starting to do commission work. The Pet Project started as a way to get my art out there, while also being able to earn a little money and be able to donate a little as well. My husband and I have now adopted two rescue pups, so I'm very fond of animal welfare organizations.

Anyway, if you want to see more of Jane's work, please check out her blog here. On her blog are links to the website where she sells her work. A portion of proceeds from the pet paintings (available as notecards too) will be donated to animal welfare organizations.

And, if you have some cute photos of your pets and would like to see them painted, please send them to Jane at janewoodenhorse@msn.com.

Crayons

Opened up a brand new box of 64 Crayola crayons last night to color with my boys. It brought back so many memories. I love a new box of crayons. If only I could have found the box of 128.

Tuesday, July 26, 2011

Scooby and...


Shaggy? Yep. That's what the boys were playing "Scooby and Shaggy." Shaggy was looking a little blue.

"Ruh roh, Shaggy. Ruh roh."

Monday, July 25, 2011

Sneak Peek


Just couldn't wait any longer. This is a shot of my almost finished boatneck tank--designed and knit by me! More photos and details to come once it's 100% finished. Still need to finish the armholes and weave in ends.

Tuesday, July 19, 2011

So Worth the 20 hour drive

Last week we drove 20 hours to Oak Island, NC to spend a wonderful week with my family. We had such a blast with my parents, my brother and sister and their spouses, and my six wonderful nieces and nephews. I tried to take a lot of pics, but most of them aren't great. Here are a few of my favorites:

The whole crew in front of our house:We are Stone 1. There are also four other houses of my relatives (Stone 2-5) within walking distance of our house.

My sister Cat and her family:

Our immediate family:

My brother John and his family:


My oldest nephew Michael and a jellyfish he caught in his net:
My dad and my niece Lizzie reading together:

My parents and all eight grandchildren:

Feeding the seagulls:

My niece Madeline just loved the seagulls:

We went to Jungle Golf. My nephew was on one hole and hit the ball so hard that it bounced to the next hole and went in. Hole in one!:

N had fun "golfing" too:

The rock band:
These giant shovels were the huge hit of the week.

N LOVED them:

B and J in the ocean:
I love the expression on J's face. He loved boogie boarding or as he called it "surfing."

The crab Michael found and later released:

N flying a kite on the beach:
SO high!

My boys heading out into the ocean:

My family has been going to this same beach for years (over 30) and I just love it. It feels like my home away from home and I love that my boys love it too. Can't wait to keep going back for years and years to come.