Showing posts with label finished. Show all posts

Wednesday, February 1, 2012

Finished: Rippled Cardigan for Cat

I finished knitting, blocking and seaming my sister's Ripple Cardigan. I made myself this cardigan in orange a while ago and wear it often. It's great over simple dresses, tanks, t-shirts and even long sleeved-shirts. A few months ago my sister requested one in cream and here it is:

When I knit my Rippled Cardigan I had a lot of trouble with dropped stitches. Since that time I have knit with this type of yarn (laceweight Mohair blend) a lot and thus had very few dropped stitches this time around. This sweater knit up very quickly. The seaming seemed to take almost as long as the knitting, but was enjoyable in its own way.

One trick I used for seaming, was holding the sweater pieces together with carefully placed bits of yarn. I lined up two end points (for example, the top and bottom of a seam) and tied them together. Then I folded each piece in half and marked the center points and tied them together. Then I kept halving the distance between two tied together points until the ties were only around 2 inches apart.


My other tip for this sweater is to make sure you bind off VERY loosely--especially on the fronts. They are knit side to side and the back is knit top to bottom. Thus if you bind off the fronts too tightly, it will make the side seams bunch when you sew the fronts to the back.

This detail on the back of the neck is one of my favorite parts of the sweater:

Pattern: Ripple Cardigan by Coralie Meslin
Size: Smallest
Yarn: 4 skeins of Debbie Bliss (76% Super Kid Mohair/ 24% Silk/ 200m/ 25g/ laceweight)
Color: Cream (15006)
Mods: I changed the sleeves to elbow length bell shape sleeves. See my Ravelry page for more details.

Tuesday, January 17, 2012

Finished: Folded

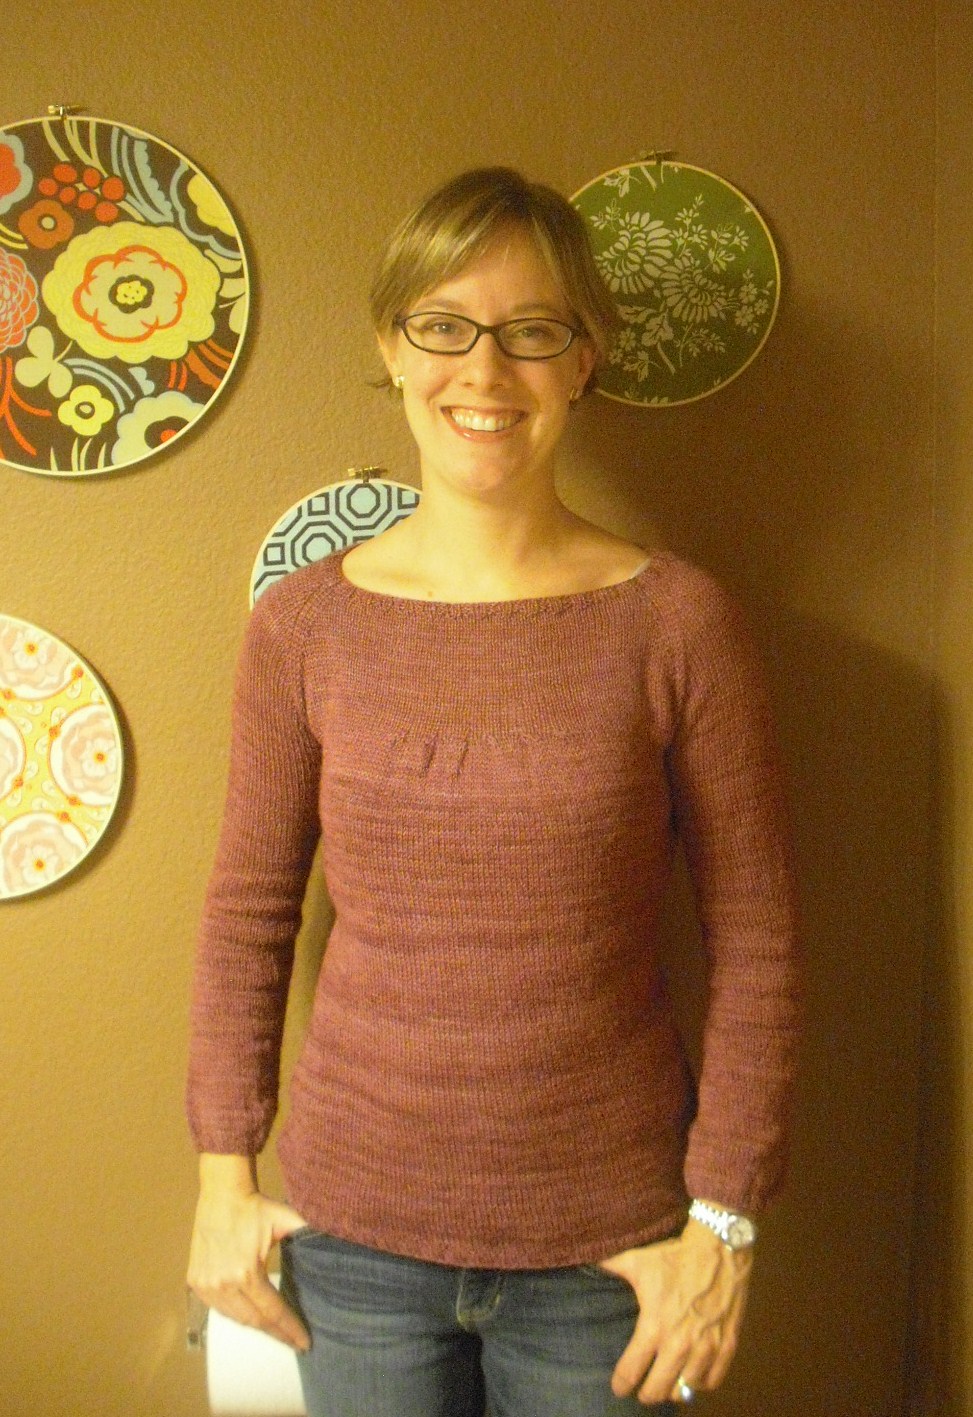
I finally finished Folded, a fun sweater pattern by Veera Valimaki, that I have been working on since the end of August! I can't believe it took me so long to knit this sweater. For the first few months (September and October) I had very little knitting time due to J's new school schedule and various Halloween-related crafts including making Halloween costumes for B and I.

Since then, I haven't had a good excuse. I had some real issues with the sleeves--but not all the sweater's fault. I knit my first sleeve 4 times. The first time, I misread the pattern and forgot to put in the increases. The second time, the sleeve just felt too tight. The third time, I changed the increase placement but still felt the sleeve was too tight. Finally, on my fourth try I moved up a needle size (to 4s for ribbing and 6s for stockinette) and did the increases earlier. Details on Ravelry.

Anyway, I finally finished knitting the sweater in December, but left it waiting to block and ends waiting to be woven in until after I finished knitting the pieces for my sister's Ripple Cardigan. I ended up blocking both at once and then finishing this one. I am still seaming the cardigan.

I wore my Folded sweater on Sunday and like it a lot. The fingering weight yarn makes it nice and lightweight. After blocking, it has a really nice drape to it. I like the simplicity of the stockinette stitch with the little bit of added interest the folds at the center above the bustline add.

Pattern: Folded by Veera Valimaki
Yarn: 3 skeins of Araucania Itata Solid (fingering weight, 70% super wash wool/ 15% silk/ 15% bamboo, 100g, 430 yd)
Needles: Size 3 body ribbing, Size 5 body stockinette, Size 4 sleeve ribbing, Size 6 sleeve stockinette
Size: xs, 32" bust
Mods: Changed increases for sleeves. Knit sleeves on larger needle. Made sleeves bracelet length. Added 3 rows of 2 x 2 ribbing around neckline to keep it from rolling.

Saturday, November 5, 2011

Payton Update

Well, Payton's name has stuck. She seems to respond to it and the boys like it--so Payton it is. As you can see, she and Pepper are still having a blast.


Payton is just enough bigger than Pepper that we've decided not to let her get on the sofa. But I felt bad for her sleeping on the floor, so I made her a dog bed. I just bought some really soft fabric and made a big pillowcase and then filled it with three pillows. It was really easy to make and I can just slip the pillows back out to wash it. And the fabric I picked matches Pepper and Payton perfectly :).

As you can see, Payton is enjoying her bed.


I made one for Pepper too. Hers is smaller (just two pillows inside).
But Pepper would rather just sleep on the sofa.

But N really likes her new dog bed.
These were so easy and inexpensive to make. The pillows were $2.50 each. I used a coupon to buy the 3 yards of fabric.

Happy Saturday, everyone! Hope you have a great one!

Friday, August 26, 2011

Lemongrass Island: AFTER

I took my Rock Island shawl and gave it bath in warm water and Eucalan (no rinse wool wash).


Rolled it in a towel to get out excess water. Stretched it out and pinned it in place with blocking wires and pins.
And now, in less than 24 hours, this:


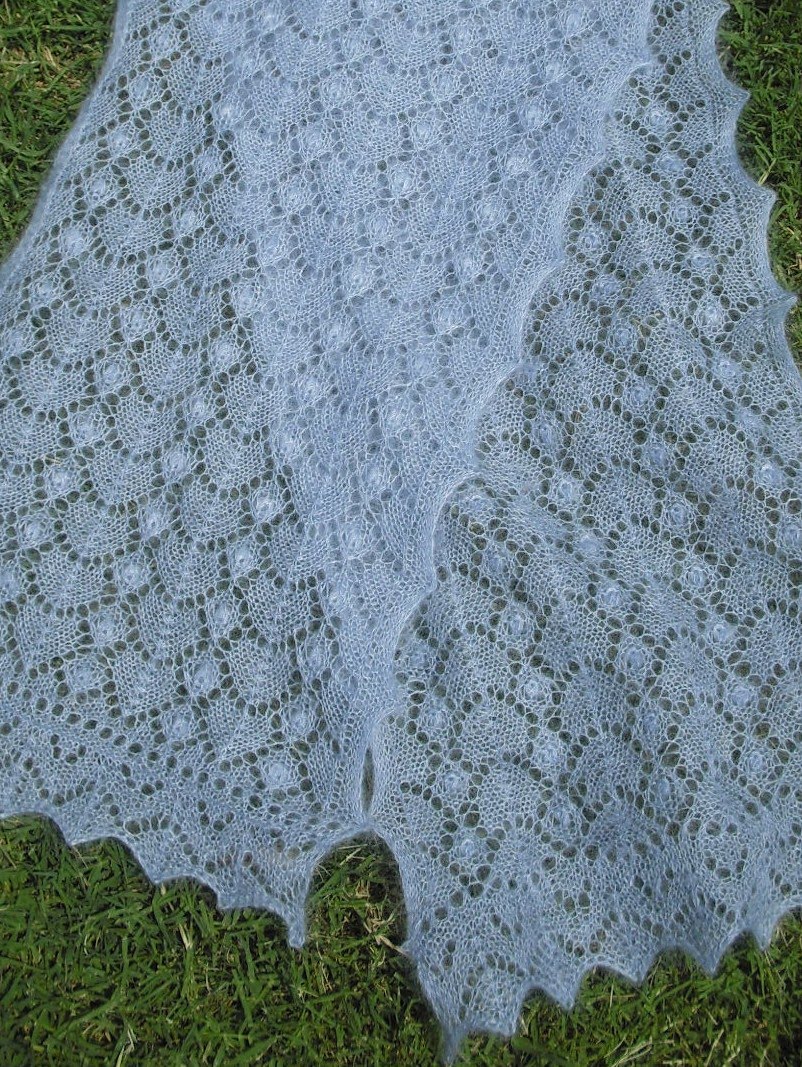
Has become this:
But to really appreciate its beauty, you have to see the outside shots where you can really appreciate the pretty color of this yarn and the delicate nature of this shawl.


Pattern: Rock Island by Jared Flood
Yarn: less than one skein of Sunrise Fiber Co. Lace Silk Merino in Lemongrass (80% Merino/ 20% Silk/ 50g/ 656yds)
Needles: Size 7
Finished size: 48" (at widest point) by 22" (at deepest point) [relaxed after blocking]
Mods: I wanted a smaller shawl--so I might actually wear it. I only did 61 repeats of the lace edging and thus only had 248 YOs to create 251 stitches. Then I only did 4 sets of garter stitch decreases to get to 235 st to start the Rock Island lace chart. For the chart, I only did 14 repeats (instead of 17) of the six stitch repeat. After the Rock Island chart, I followed the pattern as written until I had 13 st. I then did this as my final decrease row: K2, K2tog, K1, SSK, K2, SSK, K2. This left me 10 stitches. I grafted them together (5 and 5) using the Kitchener st.
On Ravelry here.


Thursday, August 25, 2011

Lemongrass Island: BEFORE

Finished knitting my lace shawl! Here it is:


My Lemongrass Island!

Okay, so it doesn't look like much yet. But just wait to until I block it. Then the magic happens.

AFTER pictures coming soon.

Monday, August 8, 2011

Finished! My First Sweater Design

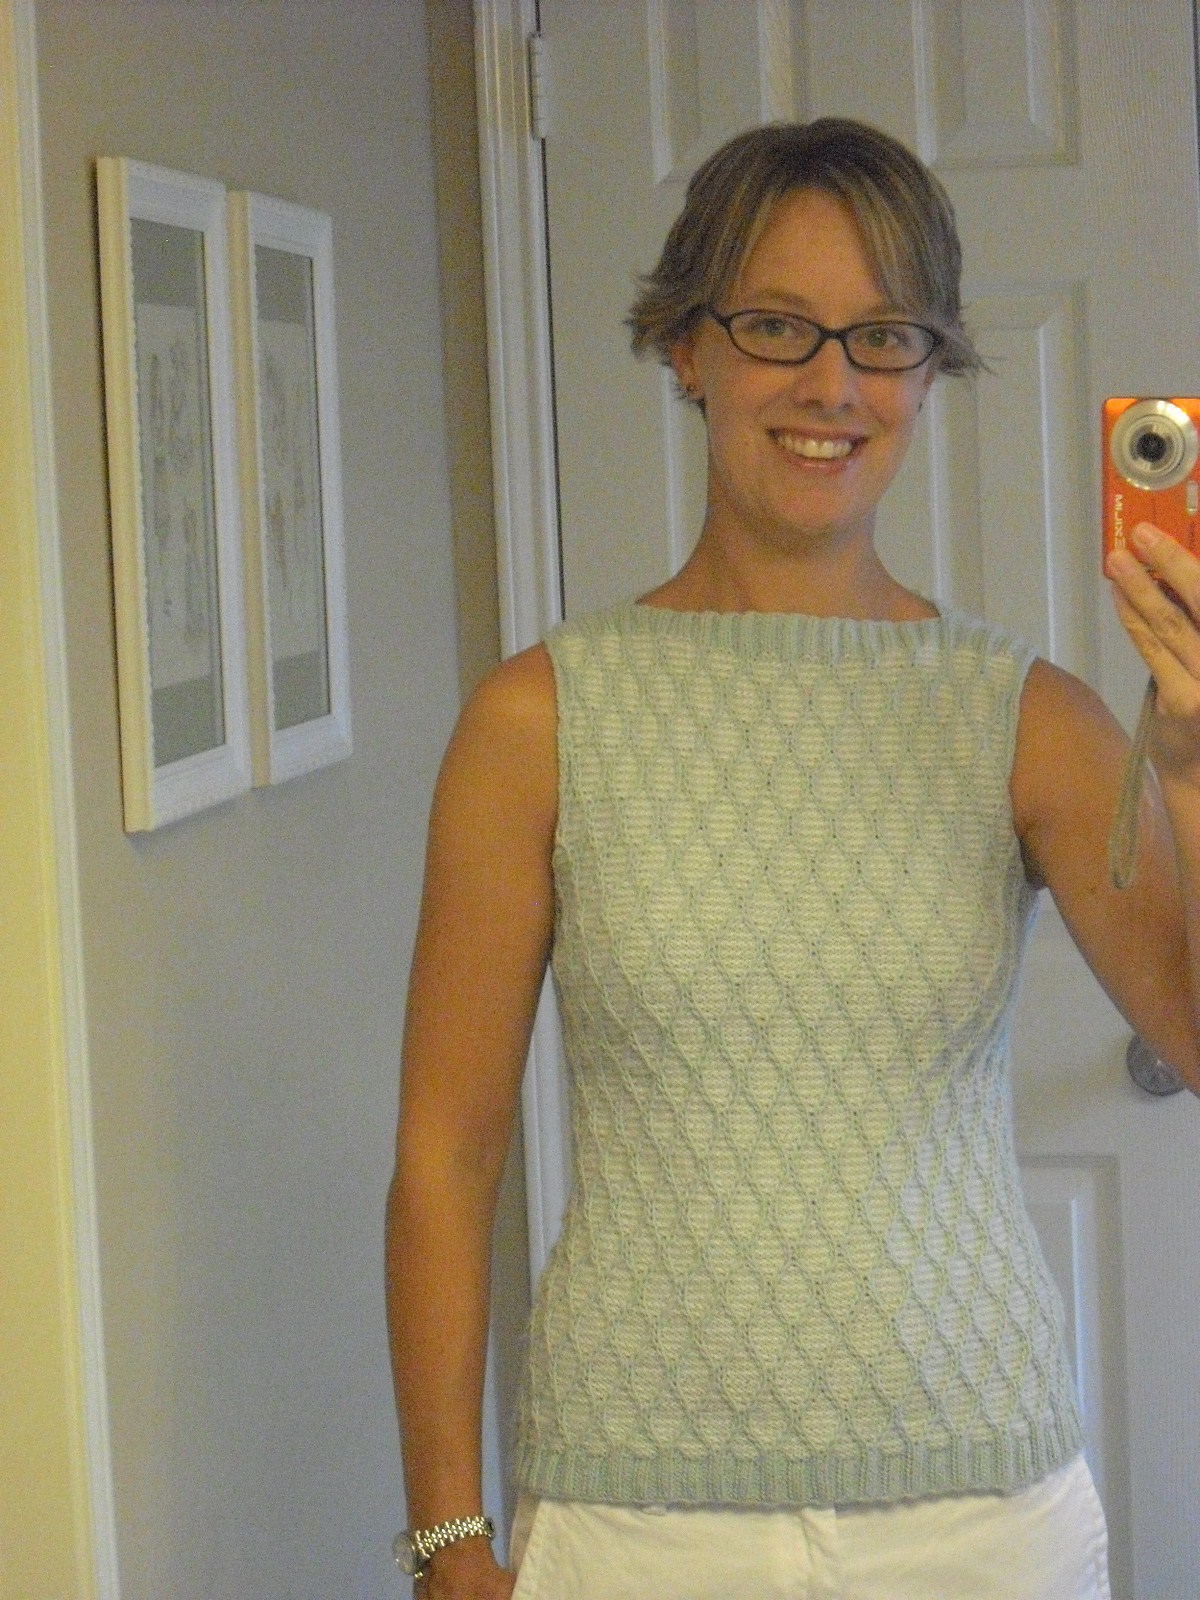
I did it! I can't believe I actually did it! I knitted a sweater from a pattern I designed myself and I LOVE it! I feel like a little kid on Christmas morning!


A few months ago I saw a hat (Courtyard) on Ravelry that I just fell in love with. Well, not the hat exactly, but the stitch pattern. I loved the cool hourglass-shaped twisted stitch pattern. So I bought the pattern, knit the hat and decided that I needed to knit a sweater in this stitch pattern.

LinkI've read a number of books on knitting and designing your own knits. All of which, I referred to during this process. My favorites are:
Knitwear design Workshop by Shirley Paden
Custom Knits by Wendy Bernard
Knitting from the Top by Barbara G. Walker

I love knitting in the round and top-down which is what both Wendy and Barbara teach. Shirley's designs all focus on knitting in pieces and usually bottom-up, but her attention to detail and using math really helped me a lot.

Anyway, I originally pictured a long-sleeve sweater in the same color scheme as my hat (golden yellow and white). However, I just couldn't figure out how to make this stitch pattern cooperate for a raglan and I just didn't feel like messing with set-in sleeves--so I decided to knit a boatneck tank. I also decided to knit in the round and from the bottom up. Although I often prefer top-down, bottom-up seemed to make more sense with this stitch pattern and style.

Next came the search for yarn. I just couldn't find yarn that I loved in the golden yellow and white (and suitable for a boatneck tank). Finally, as I perused my local yarn shop for the umpteenth time, I found the yarn: Sublime baby cashmere merino silk 4 ply. It is so soft (perfect for wearing next to bare skin) and lightweight (perfect for a summer tank). This was a step outside my comfort zone as I don't usually knit with anything quite this nice, but it worked out beautifully. I chose a white and a very pale greenish blue.

My next step was making a huge swatch (7 inches by 15 inches) knit in the round like my sweater.

Next, I looked through my shirts to find one with a fit I loved and that would work well for a model for my tank. I have a boatneck 3/4 sleeve shirt from Gap that I love and I decided to use it for measurements. I measured the shirt's width at the bottom hem and then continued measuring the width at one inch intervals until I reached the top of the shirt. I made note of armhole location as well. I kept these measurements with me throughout the process and they served as a sort of schematic for me.

Next, I did lots of math. I had already found my gauge from my giant swatch (8 st per inch and 10 rows per inch). I figured out how many stitches I needed to cast on (for the ribbing). I had decided to do a K2, P3 ribbing (instead of my original K2, P2 ribbing on my swatch) so that the bottom did not pull in. I figured out that I could simply decrease on the first row after ribbing to get everything to line up nicely from the ribbing to the twisted stitch pattern. After I figured out my cast on number and how to transition from the ribbing to the stitch pattern, I started working out where and how my decreases and increases would work. I even charted out the pattern to see how the decreases/increases would affect the flow of that part of the stitch pattern. I was lucky in that my stitch gauge was 8 stitches. Thus I had to decrease 4 stitches to decrease 1/2 inch or just 2 stitches to decrease 1/4 inch. My row gauge worked out to 10 rows per inch which was perfect as the stitch pattern was split into two 10 row repeats.

At this point, I just had to cast on and start knitting. So I knitted up to the armholes and then stopped to figure out the math for the armholes. I used Shirley Paden's Knitwear Design Workshop to help me. I was really nervous about it, but finally just did it and it worked out great. At this point, I had to switch to knitting back and forth. I thought this was going to make me end up with lots of ends to weave in because the pattern alternates between using the blue yarn one row and then the white the next and then the blue again, etc. This is no biggie when working in the round, you just leave the yarn and then carry it up after the next row. But when knitting flat, suddenly the yarn is at the wrong end of the row when you need it. After cutting ends for a few rows, I suddenly realized that I could just knit back when the yarn was on the wrong end. So I would do two rows right to left and then two rows left to right and then repeat. Very exciting to not have all those ends to weave in!

Finally, I approached the finish line--the top neck! I knew that I wanted a little bit of shaping, but not too much. I decided to do short rows on the outside edges of the front to give a slight dip without changing the pattern too much. I made sure that I got to a point in the stitch pattern where things were worked even so I didn't have to work twisted stitches in my short rows. I did about one inch ribbing on the top to match the ribbing on the bottom. I increased before the ribbing to do K2, P3 again. Ribbing was done on a smaller needle as well. For the back, I knit as the front except that I knit 10 more rows in pattern and no short rows. This raised the back neck up enough that the front wasn't too high. If I knit this again, I might do 2-4 less rows in the back. I think it might be a tad high. Finally I did a three needle bind off to join the top at the shoulders and a regular bind off across the front and back necks.


Now I had unfinished armholes to deal with. The fabric was too flimsy (because of slipped stitches right at the very edge of the armhole) to pick up stitches evenly. I was at a lost at first because I had originally planned a row or two of ribbing or a single crochet stitch edging. But both looked too messy with the loose slipped stitch fabric. What I ended up doing was knitting a crochet chain directly onto the front surface of the armhole. I used the blue yarn doubled and a medium sized crochet hook. I put the crochet hook directly through the fabric at the edge of the armhole, picked up a loop of yarn and pulled it through. I did this all around the armhole and am happy with the results.


Pattern: My own!
Stitch pattern from: Courtyard by Melissa Thomson


Size: Mine! Approximately 31" bust
Yarn: Sublime baby cashmere merino silk 4 ply (50g/ 170m/ 184yds/ 75% extra fine merino/ 20% silk/ 5% cashmere) 2 skeins of white, 3.15 skeins of blue
Needles: Size 4 for body of sweater, Size 3 for ribbing, US G6/4.00mm crochet hook for armhole edging

Anyway, there is way too much information about how I designed and knit my first sweater. Now all I have to do is come up with a good name for it. Any suggestions?


I was originally calling it Courtyard Tank after my inspiration and source of stitch pattern. Then I thought of the oh-so-exciting Boatneck Tank. But I want something better. Maybe one catchy word that captures it's essence. Would LOVE some suggestions (hint, hint)...

And, of course, my boys decided to join the photo shoot. Got to love them!


Wednesday, June 8, 2011

Knitting Update

I finished knitting my mother-in-law's Peacock Tail and Leaf scarf a few weeks ago. Blocked it about a week ago and wove in the ends today. This is the second time I knitted this pattern and it's a relatively simple one if you are comfortable with lace. This one went quickly with very few errors to correct along the way. There is something to be said for knitting a scarf you have already knit before.


Pattern: Peacock Tail and Leaf Scarf by Nancy Bush
Yarn: 2 skeins of Schulana Kid-Seta in Color #13 (70% Kid-Mohair/30% Silk/ 25g/ 210m/ laceweight)
Needles: Size 3
Modifications: Added two repeats of middle lace pattern for a little additional length.


Then I decided to knit this hat.

The pattern is called Courtyard and I spotted it on Ravelry a while back and fell in love with the twisted stitch pattern. I want to make a boatneck shell featuring this stitch pattern and thought that knitting the hat would be good prep for that. I really wanted to do a bright marigold yellow and white (inspired by one of the hats on the Ravelry page). The only yarn I found that I liked in these colors was full o' sheep yarn by Stitch Nation. Although this yarn worked fine for the hat, it was too itchy for a shell. I like the way this yarn looks--and the colors are lovely--but I didn't really enjoy knitting with this yarn. Can't tell you exactly why.


Pattern: Courtyard by Melissa Thomson
Yarn: Stitch Nation by Debbie Stoller Full o' Sheep (100% Peruvian Wool/ 100g/ 155yd/ 142m) One skein of Little Lamb (white) and one skein of Honeycomb (yellow). Had between 1/2 and 1/3 of each skein leftover.
Size: Larger size. Probably could have gotten away with smaller size for my pea head.
Needles: Size 6 for ribbing. Size 7 for rest of hat.
Modifications: None.


Since I didn't love the yarn I used for the hat, I went to my local yarn shop and looked through the tons and tons of yarn options. After much debate, I decided to go a different route. I chose a 4ply in a white and a pale blue. I think it will be a much subtler combination, but nice all the same. The yarn is very soft--baby cashmere merino silk--and will feel nice next to my skin. Here's a picture of my swatch.


It's a 14" circle that is about 4 inches tall. I knit it in the round since I plan to knit my boatneck shell in the round. This will be my first real design project so wish me luck. I'm going to try and work out the numbers tonight. Can't wait to cast on!

Tuesday, May 3, 2011

Baby Gifts

This weekend I went to a baby shower for a good friend who is having her second little girl later this month. I decided to make her a few things for her new baby.

First, I made a little lovey blanket out of this fun pink fabric and backed with super soft pink minky. I also embroidered it with a fancy K (for baby Kenzie).


I also knit this sweet little short-sleeve sweater.

The pattern is a free one by Carole Barenys. It's a simple easy little baby sweater. My only complaint about the pattern is that there is no gauge and no length measurement so not sure what “size” I made.

I made a few mods. I moved up to a size 5 needle because I felt the fabric was too stiff on size 4 needles. I also moved the placement of the buttonholes. After the first one, I placed the buttonholes every 8 rows so all 5 buttons are at the top of the sweater. I also replaced the recommended buttonholes with a 2 row buttonhole. Cast off one stitch (3rd from end) in one row and add it back in on the next row with a Kfb (2nd st from beginning). I also did short sleeves. I picked up all stitches on hold (36) and then 7 additional stitches along underarm. I then knit 3 rows, then did a garter stitch border (P1 row, K1 row, P1 row, K1 row, P1 row, bind off in knit). I did not do any additional decorative rows on the sleeves or at the bottom of the sweater. Decided to keep it simple.

I did short sleeves since this is for a Texas baby and hopefully this will mean she can wear it more.

I followed the numbers for the smaller size in the pattern, but with size 5 instead of 4 needles. Chest circumference of about 21”. Length from neck to bottom of sweater of about 11”. I think this is a 6-9 month size.

Pattern: Seamless Yoked Baby Sweater by Carole Barenys

Yarn: About half of a skein of Bernat Baby Softee in White (120g/ 330yd/ DK/ 100% Acrylic)
Needles: Size 5
Gauge: Didn't measure
Mods: See notes above
On Ravelry, here.

Sunday, April 24, 2011

Happy Easter!

Hope everyone had a lovely Easter today!

We had a great one. Both boys were thrilled with their Easter baskets this morning.

J quickly got to work building a small Lego fire helicopter from his basket.

N was excited about the cat grooming toy he got.

But he was even more excited about the CHOCOLATE! He jumped into eating his candy right away.He has been anxiously awaiting the arrival of his chocolate. On Thursday when I went to preschool for the boys' Easter parties, N came running up to me and told me, "The rabbit is coming and we get CHOCOLATE!" It was pretty adorable.

We did not travel to see family, but got together with our good neighborhood friends instead. We like to think of them as our adopted family. We also invited our new next door neighbors who just moved here from Seattle. We had a wonderful meal and then a really fun Easter egg hunt. All seven children seemed to really enjoy themselves.

B, 3 years old

K, 5 years old

J, K and B

B, N and K

B, 11 years old (the lone older child and wonderfully patient with all the little ones)


Our new neighbors with their almost 4 year old and almost 2 year old


Opening eggs!

And inside some of those eggs were these little cuties.
A free pattern from Anna Hrachovec of Mochimochiland.
I used DK, Sport and Worsted weight yarn and size 2 doublepoints. I made ten between Friday night and Saturday night. I did a few extra rows of i-cord on the ears to make them a bit longer.
On Ravelry, here.

Hope you all had a lovely Easter day!